

A fan that switches itself on.
In part one I explained how I rescued a 2012 Mac Mini to turn it into my home server and how, when it started overheating with the photo gallery, I designed a custom stand for it with an 80 mm USB fan underneath. This second part covers what was missing: making the fan switch itself on only when it's needed.
Switching it on only when needed: the Evercooler project
With the fan fitted under the Mac Mini, I still had to decide when it spins. Leaving it on all the time is the easy option, but the server is quiet most of the day and only heats up at specific moments (in my case, mostly when the photo gallery starts indexing). I wanted the fan to come on only when the Mac Mini starts working hard and to switch off when it's done, without me having to remember anything.
The dilemma
My first idea was a smart plug with its app, but that's a remote switch, not automation. I'd still be the one deciding when to turn it on.
The second was to set it all up in Home Assistant. It works, but I don't run it on the server, and setting up a whole platform for a single fan felt like using a sledgehammer to crack a nut.
I also wasn't sure what to measure. Temperature is the intuitive choice, but there's a catch: when the fan cools the machine down, the temperature drops, the system decides to switch it off while the load is still running, and it heats up again. The CPU doesn't depend on the fan, so it doesn't fool itself. It also gives earlier warning: when the CPU goes up, the heat hasn't arrived yet.
The middle ground
A USB wifi relay between the Mac Mini's port and the fan cable, without stripping a single wire, and a small container that controls it. I've called it evercooler. Every 30 seconds it asks Prometheus how the CPU is doing and, if needed, switches the relay on directly over the home network.
The key is that the relay belongs to the Tuya family (the ones you control with the Smart Life app), and those devices can be controlled locally, without going through their cloud, if you know their encryption key. Getting that key is the tedious part, but you only have to do it once.
How the flow works
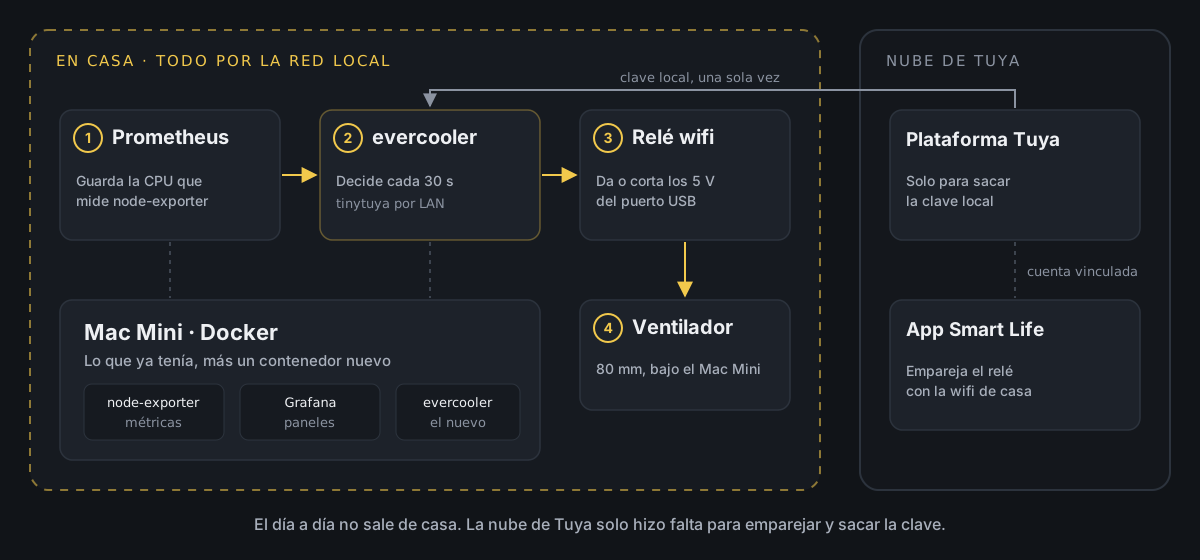
Prometheus was already monitoring the server with node-exporter, and Grafana showed it to me in dashboards. Evercooler only has to read that figure, decide and give the relay its orders. The Tuya cloud appears off to one side because it was only needed to pair the relay and get the key. Day to day, nothing leaves home.
Getting the relay's key
First, the usual: pair the relay with the Smart Life app (on a 2.4 GHz wifi network) like any smart plug. That's enough to use it from your phone, but to talk to it from a program you need three things: its ID, its IP and its local key. The key doesn't appear in the app. It's generated during pairing, and the only official way to read it is the Tuya API, which requires a developer account.
Tuya's developer site (Tuya Developer Platform) is free, but not exactly friendly. Mine came up entirely in Chinese and I had to hunt for the language selector to switch it to English. These were the steps:
- Sign up choosing Spain as the country. If the account ends up in the Chinese data centre, it won't see European devices later.
- Go to Cloud → Development → Create Cloud Project and create a Smart Home project, with the Central Europe Data Center.
- Accept the APIs it suggests by default.
- Inside the project, go to Devices → Link App Account and scan the QR code from the Smart Life app itself (Me tab, scan icon). That way the project can see the account's devices.
- In Overview, note down the Access ID and the Access Secret.
That's where tinytuya comes in, a Python library with a wizard to download the keys. To avoid installing anything on the server, I run it in a throwaway container:
docker run --rm -it --network host -v "$PWD":/work -w /work \ python:3.12-slim sh -c "pip install -q tinytuya && python -m tinytuya wizard"The wizard asks for the Access ID (it calls it API Key), the Access Secret, the ID of any device and the region (eu). It then offers to download the names of each device's data points and to look for them on the local network. Say yes to everything. At the end it shows something like this:
Polling local devices... [Ventilador ] 192.168.1.50 - [On] - DPS: {'1': True, '9': 0, '38': 'memory'}That's everything you need: the IP, the fact that the relay responds, and its state. The numbers are the device's "data points". 1 is the switch, 9 a countdown I don't use and 38 what the relay does when the power comes back. Tuya's documentation says this last one takes 0, 1 or 2, but my relay uses off, on and memory. I set it to on, for a reason I explain further down.
The wizard saves the IDs and keys in some JSON files in the folder you run it from. Careful: it brings the keys for every device on the account, not just the relay. Those files are stored with restrictive permissions and never pushed to any repository.
Testing the relay from a program
With the key in hand, controlling the relay takes four lines. An example with made-up data:
import tinytuya rele = tinytuya.OutletDevice("ID_DEL_RELE", "192.168.1.50", "CLAVE_LOCAL")rele.set_version(3.5) print(rele.status())rele.turn_off()You should see something like this, and the fan stops:
{'dps': {'1': True, '9': 0, '38': 'on'}}The protocol version (3.5 in my case) is also given by the wizard. If it doesn't match, the relay won't answer.
Where the CPU figure comes from
Evercooler needs nothing beyond what was already there: it asks the Prometheus API for the average CPU usage over the last two minutes.
100 - avg(rate(node_cpu_seconds_total{mode="idle"}[2m])) * 100The query measures how much of the time the cores haven't been idle and turns it into a percentage. The two-minute average filters out spikes of a few seconds, which don't heat anything up.
To choose the threshold, before writing a single line of code I looked at what had happened over the previous two weeks. The load turned out to be very black and white: half the time the CPU was below 11 %, and when it went up, it shot to almost 100 % for about half an hour, roughly three times a day. With that profile, the exact threshold hardly matters. I went with 80 %.
Ten-minute windows
What I didn't want was a fan switching on and off every 30 seconds following the CPU. So the logic works in windows:
- If the CPU goes over 80 %, it switches the fan on and opens a 10-minute window.
- During the window it doesn't decide again: the fan spins no matter what.
- When the window ends, it checks again. If the CPU is still high, another 10-minute window. If it has dropped, it switches off.
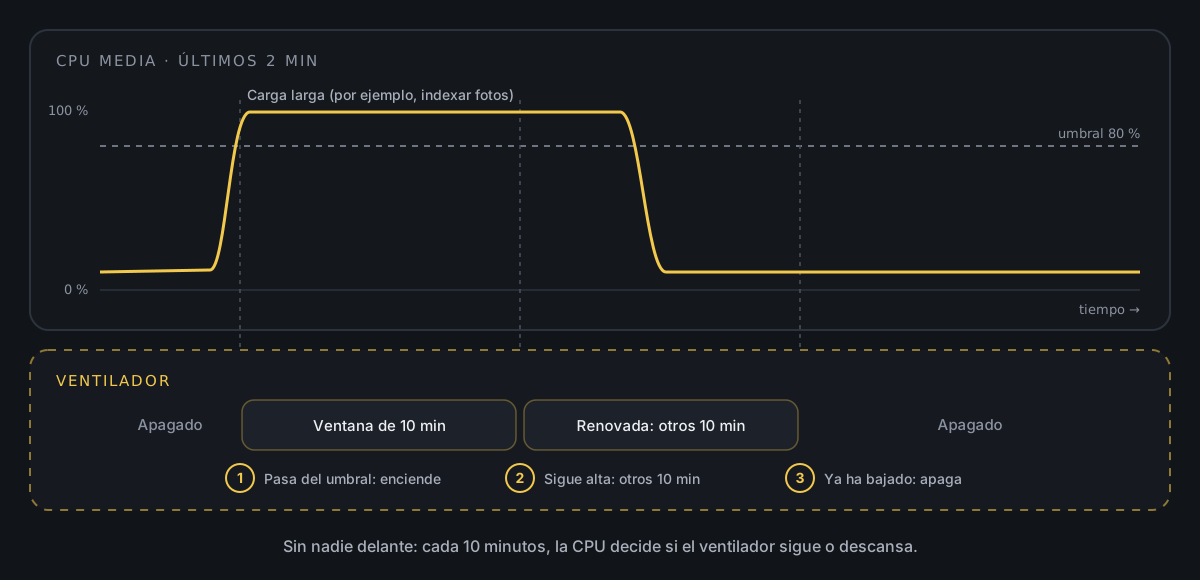
In practice, the fan stays on for the whole load and then gives one last pass while the machine cools down. Nobody has to touch anything.
The heart of the program, simplified:
import timeimport requests # rele is the same OutletDevice as in the previous example UMBRAL = 80VENTANA = 10 * 60CONSULTA = '100 - avg(rate(node_cpu_seconds_total{mode="idle"}[2m])) * 100' def leer_cpu(): r = requests.get("http://prometheus:9090/api/v1/query", params={"query": CONSULTA}) return float(r.json()["data"]["result"][0]["value"][1]) encendido = Falsefin_ventana = 0 while True: cpu = leer_cpu() ahora = time.time() if not encendido and cpu >= UMBRAL: rele.turn_on() encendido, fin_ventana = True, ahora + VENTANA elif encendido and ahora >= fin_ventana: if cpu >= UMBRAL: fin_ventana = ahora + VENTANA else: rele.turn_off() encendido = False time.sleep(30)The real version does a bit more: it reads the relay's state on every loop (in case someone has touched it from the app) and exposes its own metrics so that Prometheus keeps an eye on it too. But that's the idea.
Things to bear in mind
If something fails, better on than off. A 5 V fan spinning more than it needs to does no harm. A server without ventilation under full load does. That's why, if Prometheus stops responding, evercooler switches the fan on. If I stop the container, it switches it on before exiting. And the relay is set to start up switched on when the power comes back (data point 38 set to on). That's also why I don't use the relay's built-in countdown, because it would do the opposite: if the program crashed, the fan would end up off.
Manual changes are respected. If I switch it on from the app, evercooler notices and gives it its 10 minutes. If I switch it off while the CPU is high, it switches it back on.
The relay still talks to the cloud. Even though evercooler doesn't use it, the relay keeps its connection to Tuya's servers, which is how the app's orders reach it. Looking at the DNS queries in Pi-hole, only Tuya domains show up, and very rarely, but it's worth knowing. If you want to cut it off completely, you can block that traffic or replace the relay's firmware with an open one, although that's a whole other story.
It keeps working without internet. Control goes over the local network, so a fibre outage doesn't leave it brainless. The only thing you can't do without a connection is use the phone app.
You don't need the developer account afterwards. As soon as I had the key, I unlinked the app and deleted the project from the Tuya platform. The key still works because it lives in the relay, not in the project, and that way there's no API access left open to all my devices. The downside is that if I ever pair the relay again, the key changes and I'll have to repeat the process.
Why I like it
Now the Mac Mini works in peace, the fan only shows up when it's needed and I've forgotten it even exists, which is the best compliment you can pay an automation.
None of this would have been so easy without tinytuya, so thanks to the people who maintain it, for the love of it, so that the rest of us can control these devices locally.
Thanks for joining me through both parts of this summer of tinkering. If you fancy building something similar, let me know on social media, I'd love to see it.